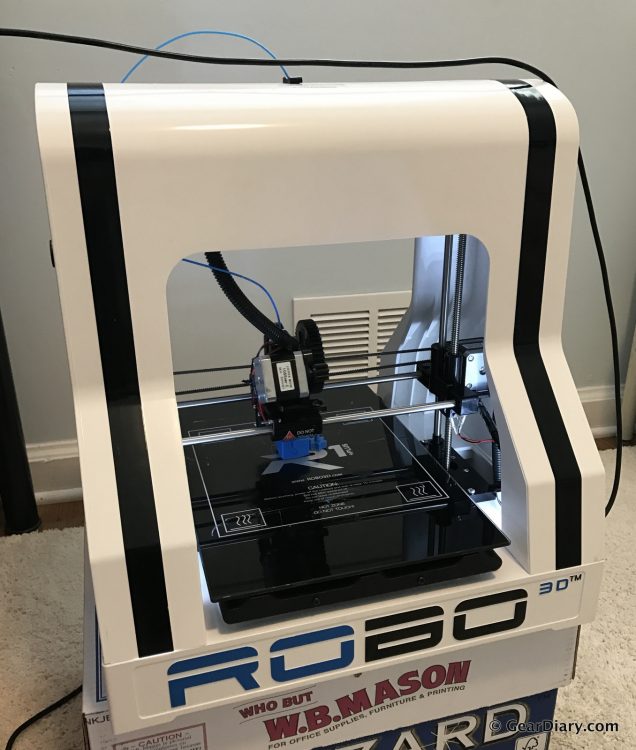
The Robo3D R1 Plus is a 3D printer that’s simple enough for beginners, but capable enough to keep hobbyists happy. At $799.99, the R1 Plus comes with everything you’ll need to start printing right out of the box, except for a computer. 3D printing is a great way to get kids, or anybody, interested in STEM, so join the revolution!
The Robo3D R1 Plus comes fully assembled and calibrated. It also comes with a 300 gram spool of blue PLA filament and 1 year free use of AutoDesk Fusion 360, a top application for 3-dimensional design and modeling, a $300 value. Robo also provides a Tool Kit, free Robo-branded MatterControl software, power & USB cables, a micro USB and micro SD card, 24/7 customer support, and a 6 month parts replacement warranty.
The printer itself measures at about 18”h x 17”w x 15”d not including the filament spool and the printer weighs about 22.5 pounds. You may want to have a location in mind for the printer to go, due to its large size and weight. While it’s not crazy heavy, it’s awkward to carry so you might not want to be moving it around too often.
The R1 Plus has a build area of about 10” x 9” x 8”, or 720 cubic inches of build space. That’s a very large build space for such a moderately priced 3D printer. A larger build space, of course, allows you to print larger products. That’s a huge advantage of this printer and a great value-add. The R1 Plus features 9-point automatic bed leveling each time your printer starts to print, so that you can be sure that your print will come out right each time without manually leveling the bed. The R1 Plus does, however, lack an LCD screen, which many 3D printers are equipped with at this time. An LCD screen would be helpful to be able to check the status of a print, check the temperatures of the extruder or plate, and more.
The extruder nozzle or “hot end” is made of all metal and can be heated to 290-degrees Celsius, which allows you to print with almost any material out there. The bed plate on the Robo3D R1 Plus can also be heated, which dramatically improves print quality by keeping the extruded plastic warm and preventing warping. The R1 Plus can reach a print quality of up to 100 microns, which is equivalent to 0.1 millimeters. This is a high-resolution that used to require machines that cost thousands of dollars to print to this resolution. To achieve 100-micron print resolution, simply select “high quality” in the printing settings.
The Robo3D R1 Plus is also open source, meaning that you’re able to use any printing software that you’d like with this printer. For instance, even though Robo3D provides free Robo-branded MatterControl software, you’re also able to use any other compatible free software like Repetier Host, or paid software like Simplify3D depending on your preferences.
Although Robo brands the Robo3D R1 as “plug-and-print,” the Robo3D R1 Plus was not all fun and games for me from the get go, as I had to do some tinkering with the machine itself and a lot of tinkering with the MatterControl software to get my prints right. That is not to say that the Robo3D R1 Plus is not “plug-and-print,” I just think that 3D printing in general has a decent learning curve. A lot of credit should go to Robo3D’s helpful user forum as well as Robo3D’s excellent customer support team. I spent over an hour and a half on a Skype video call with a very patient and knowledgeable Robo3D technician named Robert who helped me recognize some of the physical concerns with the printer and walked me through repairing them. I should also mention that Robo offers FREE Skype calls with their technicians between the hours of 9am-5pm pacific time, Monday through Friday. Robert was nice enough to stay on the phone with me well past 5:30 pacific time to solve my issue.
I also realized that the bottom layers of my prints were not sticking to the printer plate, which caused the prints to shift around the plate, which in turn messed up the prints. After some research, I realized that Robo3D recommends the use of either hairspray or a glue stick on the glass plate to ensure that the bottom layers of your prints stick properly. Once I tried a thin layer of glue on the bed plate, my prints stuck to the bed perfectly. Keeping prints stuck to the bed plate is a constant issue, however, that you need to keep your eyes on. I like to watch my prints for the first 15 minutes or so just to be sure they don’t slip.
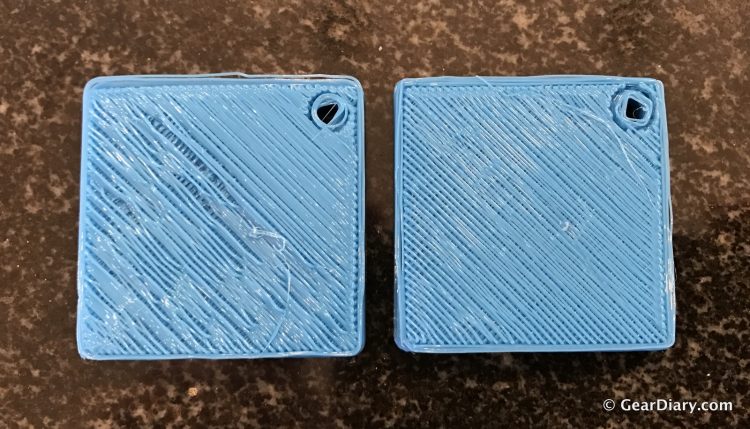
In addition to the fiddling I did with the printer itself, I needed to adjust a number of settings in the MatterControl software to ensure that the “skirt,” the first layer of the print, was printed properly. In the beginning, the bottoms of my prints were coming out poorly, with a lot of negative space. While the top looked like a decent finished product, the bottom of the prints looked like it was amateur hour. By adjusting the Z-axis offset and increasing the bottom layer height thickness, I was able to produce a much higher quality print.
See below for photo examples of a poor skirt and improved skirt:
Once I got comfortable with the printer and its software settings, I was able to print with abandon! After ensuring that your bed plate is prepped with either glue stick or hairspray, it’s as easy as downloading models from Thingiverse or any other 3D model repository, loading them into the MatterControl software, and hitting “Print!” Of course, the larger the model, the longer the print is going to take. I printed everything from the New York Yankees logo, to a Mickey Mouse keychain, to a dreidle!
Stay tuned to Gear Diary, where we’ll publish a showcase of the different prints we’ve made with the Robo3D R1 Plus.
Check out the video, below, of the Robo3D R1 Plus in action:
At the time of this review, the Robo3D R1 Plus is only able to print while connected to a computer via USB. However, Robo3D notes that they will be releasing software shortly that will allow you to take advantage of the built-in SD card slot to be able to send and print files directly from the SD card. This will give the Robo3D R1 Plus internal memory that will allow you to unplug the computer once the file has been sent, allowing the printer to finish printing on its own. This will be a welcomed feature in my opinion.
The Robo3D R1 Plus is an impressive combination of high-quality printing, user-friendliness, and adaptability at a budget-conscious price point. While 3D printing requires a period of research and learning, once you get the hang of it, Robo3D does make it very easy to do. Robo3D’s customer service is outstanding, so you know they’ll stand behind their products if you run into any issues.
Also, be sure to check out Robo3D’s new line of 3D printers, the R2 and the C2, which will be shipping in January, 2017. They will come equipped with color touch screens, Wi-Fi connectivity, and even an on-board camera for remote print monitoring. Gear Diary plans to cover Robo3D’s new line of 3D printers in early 2017.
You can purchase the Robo3D R1 Plus from their website at Robo3D.com.
Source: The Robo3D R1 Plus was a manufacturer provided review sample
What I Like: Comes with everything you need to get printing out of the box; Large build area; Produces good quality prints; Easy to use once you get the hang of it; Great customer service
What Needs Improvement: Lacks an LCD screen; Requires a computer to print at the time of this review; Takes some tinkering with the printer and software settings, but this is likely common with 3D printing in general


