
For years, Kev and I have talked about planting a garden so we could grow our own vegetables and be somewhat self-sufficient. Because we live on the top of a big rock, if we plant a garden it will be an endeavor involving a bulldozer and hauling topsoil. Until that becomes feasible, we’ll have the OPCOM Farm GrowBox hydroponic garden.

So let’s get to it! After placing your order, a box like this will show up at your house. This box measures about 43″ long by 29″ wide by 11″ deep, and I’m guessing that it weighs about 25-30 pounds; consider yourself warned!
After placing your order, a box like this will show up at your house. This box measures about 43″ long by 29″ wide by 11″ deep, and I’m guessing that it weighs about 25-30 pounds; consider yourself warned!

The box is chock-full of the parts needed to put together the GrowBox; there is the approximately 38″ long by 27 main body of the grow box, the four tubes that make up the lighting support kit, the 8 screws you’ll need for installation with a Phillips head screwdriver (included), four E26 mount LED grow lamps, a climbing tube holder, four climbing tube, a sprout cover, 12 sprouting sponges, an insect net (also handy for keeping your cat out, I’ve found), a draining tube, a warranty card, a user manual, and a Growing Starter Kit.
There’s a lot of plastic wrapped around the pieces, so unpacking takes a while and creates a pile of recyclable cardboard and non-recyclable styrofoam and plastic wrap. The upside of all of this is that your items will arrive pristine, unscratched and unbroken.


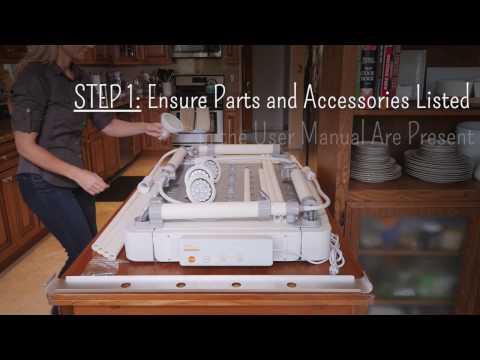
The first part of putting the OPCOM Farm GrowBox together is to raise the four support arms straight up. You’ll want to make sure that they are as far down as they will go, and you’ll need to lock the lever on each arm to make sure that they stay there. Next, it’s time to put in the four tubes that will help make the support arms sturdy.


Each tube has a screw hole in its end that will need to be lined up with the socket on the corresponding support arm. You’ll use the included screw and screwdriver to hold them in place. You only need to hand tighten the screws rather than using power tools, because you don’t want to damage the plastic.


Now it’s time to install the four LED lamps.


Now you need to add 4.5 gallons of water; for the record, that was 18 trips back and forth to the sink with my 4-cup measuring glass. 😛
You’ll know you’ve filled it enough when the water level indicator shoots it’s blue cap to the top of the tube.

Although it’s an option that you don’t really need unless planting tall or climbing plants, so I wouldn’t have to store them I went ahead and also installed the climbing tube holder and the four climbing tubes. I then plugged in the box and turned it on to make sure that everything was working properly. The pump made a bit of racket to start, but it quickly filled with water and started humming along; it’s about as loud as the pump on an aquarium, so it’s not too obnoxious.

Here’s a video that goes over all of the steps we just did.
Now it’s time to open the Growing Starter Kit. Inside the kit, there are three nutrient starter cups, 12 nutrient adjuster cups, pH+ capsules, pH- capsules, 3 replacement pump filters, an electronic EC meter, an electronic pH meter, pH buffer powder, a pair of tweezers, 72 seed sponges, and three bottles of lettuce seeds with 75 capsules per bottle.


Before you can actually plant any seeds, you need to prepare the water by dumping one of those nutrient starter cups in the dosing hole. I’m completely new to hydroponic gardening, and I was wondering how the plants got their nutrients if no soil was involved — this answered my question. The pump should be on while you do this so it can disperse the nutrients through the water; after adding the nutrients, you’ll need to wait 30 minutes.


After the 30 minutes are up, it is time to test the water’s pH and nutrition concentration levels using the included pH and EC meters. Proper pH is in the 5.5-6.5 range; our water is hard at 7.2, so I needed to add several pH- capsules to the water; that brought it down to the proper levels.


The EC level is supposed to be in the 1.0-1.2 range. Mine was very low, at 0.48, so I had to add several of the nutrient adjuster cups to get the levels up to the proper range. Once a week, you are supposed to test the EC and pH and adjust and treat as necessary.


You do have the option of using your own seeds or using the capsules that come with the GrowBox. Since I am such a hydroponic gardening n00b, I decided to play it safe and plant the lettuce that came with the kit. There are 50 holes in the OPCOM GrowBox; they recommend that if you are growing lettuce you plant a maximum of 25 plants, spreading your seeds/future plants out so that they have room to grow. To that end, I pulled off a block of 25 seedling sponges. Each approximately 1″ cube has a slit in its center to hold a seed capsule. You need to get the sponge totally wet in the sprout tray area of the GrowBox, letting it soak up the nutrient-rich water.


With dry hands (or using the included tweezers), you’ll insert one lettuce seed capsule into the center of each seedling sponge. You push them in about half-way — the tip of the capsule will still be poking out of the top of the sponge. Let these sit in the sprouting tray for about 30 minutes.


After the 30 minutes is up, the bottom of the seed capsule will have dissolved in the water, and you can remove the top part of the capsule with the included tweezers.
Now you break the seedling sponge into single squares and place them into the holes in the growing plate. Like I mentioned before, OPCOM Farm suggests that if you are growing lettuce, you plant in every other hole so that the lettuce will have room to grow. Small plants like herbs can be planted in every hole. You’ll want to place the seedling sponges so that they are suspended in each growing plate’s hole – not pushed below the hole and all the way down into the water.

Once you’ve planted all of your seed sponges, you enter the germination stage. For the next 48 hours, the power to the OPCOM Farm GrowBox needs to be left off. Once the seeds have started to sprout, you can turn the GrowBox power on and put it into AUTO mode for the next 7 days.
Because we have a curious cat, I decided to go ahead and put the bug net over the GrowBox; it’s working to keep him away so far! I was afraid that he would try to drink the water or would want to lie in the garden, but the net works! The climbing tubes stand about 43″ tall, just to give you an idea of how high the complete kit is.

The climbing tubes stand about 43″ tall, just to give you an idea of how high the complete kit is.
Here’s a little bit more about planting in the GrowBox.

I left early this morning for CES, so Kev will be keeping an eye on my seedlings for the next week. In roughly 48 hours he will turn the OPCOM Farm GrowBox on for me (assuming we have seed growth by then, otherwise, he’ll wait to turn it on for another day), and then we’ll enter the next phase of farming.
UPDATE: Here are some pictures of the lettuce that grew in its various stages! Unlike lettuce I’ve bought at the store, the lettuce I grew was flavorful, absolutely guaranteed pesticide free — and best of all — I grew it myself!


The OPCOM Farm GrowBox Indoor Hydroponic Gardening System retails for $509, and it is available directly from the manufacturer.
Source: Manufacturer supplied review sample
What I Like: Easy setup; Includes everything you need to get started; Easy maintenance; Healthy, pesticide free, tasty lettuce!
What Needs Improvement: This particular model is large (but they have smaller ones); Expensive