Having used iTunes Match along with iTunes in the Cloud for the last few months, I have developed a few habits that I don’t even realize are new anymore! This weekend I gave my younger son my 4th gen iPod Touch to use as his own, as he was constantly pushing beyond the limits of his 8GB iPod Touch that was the pseudo 3rd gen that was really a 2nd gen model holdover. Since I almost never use it, I had no qualms since I’d rather it actually get used than sit idle.
But while going through things with him I realized just how much has changed with iOS 5, iTunes in the Cloud and iTunes Match, so I figured I would share. If you are using iOS 5 these probably seem obvious, but if not they are very helpful! Note – iTunes Match is a $25/year subscription service, which is limited to a 20,000 song library currently.
- Upgrade Your Old Tracks: I started using iTunes back in 2001 even before the release of the first iPod. What does that mean? It means some of the songs in my library are 128kbps rips from CDs a decade ago. In some cases I have re-ripped content, but now there is a better way.Once you have iTunes Match and it has processed your library, you can create a smart playlist that contains only those songs with a bitrate of less than 256kbps. Then simply delete those songs and send local copies to the trash but do NOT delete them from iCloud! Simply download them again and you have 256kbps AAC files. Note that even if you end your iTunes Match subscription you can keep all the new files.
One caveat: in the case of ‘Who Are You’, there were two ‘matched’ songs that were the new versions rather than the ones I pulled from the superior CD. So on my computer they sound great, but on my iPad I have two crappy versions. Be careful to check this out before deleting songs you care about!
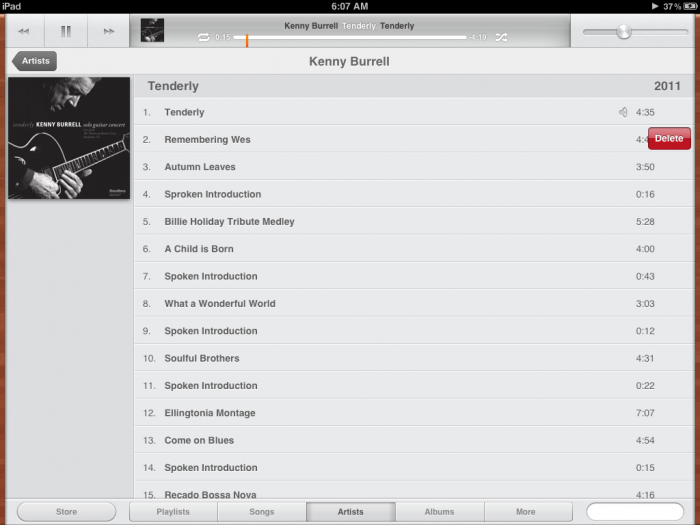
- Free Space on your iOS device: I am sure that some will laugh at me for this, but it was only a few weeks ago that I discovered how to delete songs from my iPod or iPad. You simply swipe to the right on the song or album you want to delete and a red ‘Delete’ button appears as shown in the image. Press it and the song or album gets a cloud symbol next to it. This is a great way to free up space!And for those who are interested, the album in the image is an amazing new solo guitar release by the legendary Kenny Burrell called Tenderly … check it out.
- Free Space on your hard drive: Until iOS 5 you needed to have copies on your computer of all music you planned to put on your iOS device. Now once music is in your library you don’t need it in any specific location to access it on your iOS device.So what? Well, I have historically maintained a local iTunes library and a ‘warehouse’ of all of my music on an external drive, which I would cycle in and out of my library while keeping the storage space allocated to iTunes relatively constant – to preserve open space. And, in recent discussions at Gear Diary we have talked about the move to SSD for storage, and how 256GB simply isn’t enough anymore with 8MP cameras and easy video capture and thousands of apps (some >1GB themselves), movies, music … and documents. iTunes Match with iTunes in the Cloud gives you an easy way to clear out disk space – just delete what you don’t need on your local system!
- Centralize your music In our house we have four people with very different tastes, which means that we had three iTunes libraries on different laptops (mine, my wife’s and one for the boys to share). If I bought something the kids or my wife wanted, it became a laborious process of copying across the network. Since iTunes Match, we have moved everything into my library from both other computers, so now everyone can access the entire library at will. Simple, but amazing!
And as a bonus …
When I installed Mac OS X Lion there was much to learn about changes in the new version. Around the time the new iTunes version launched we also got a new iPhoto to go along with iCloud and WiFi sync. I use iPhoto more for dealing with screenshots on my Mac and iOS devices than anything else. There was one change that really annoyed me – now whenever I went to export an image it would ALWAYS want to go to the Pictures folder. I like it on my Desktop, and until that version it would simply default to the last address – which is what I would expect a friendly program to do.
After spending way too long hunting for solutions and coming up empty … I discovered a workaround: when in the export dialog press Command-D, which then selects the desktop. It isn’t a perfect solution, but it works!
What iTunes Match secrets do YOU have to share?

